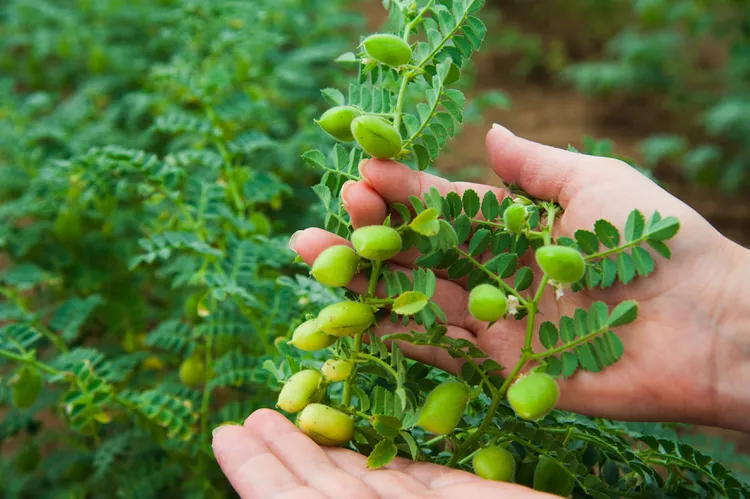
Chickpeas have been grown as a food crop for at least 7,500 years. Growers still cultivate chickpeas in pots or vegetable beds and harvest the edible beans in late summer for fresh eating, freezing, canning, or drying. Whether you call them chickpeas or garbanzo beans, these protein-packed legumes are staple ingredients in Indian, Mediterranean, and Middle Eastern cuisines, and they’re most famously used to make hummus.
Chickpeas require a relatively long growing season and warm weather to be productive, but with some planning, they can grow in chilly climates. With homegrown plants, you can harvest dried beans or pick immature chickpea pods for fresh eating, similar to edamame. Chickpeas are valued as nitrogen-fixing companion plants for crops that benefit from it, such as leafy greens, corn, squash, and brassicas.
Chickpeas Overview
| Genus Name | Cicer arietinum |
| Common Name | Chickpeas |
| Additional Common Names | Garbanzo Beans, Gram, Chana, Egyptian Pea, Chole |
| Plant Type | Annual, Vegetable |
| Light | Sun |
| Height | 8 to 24 inches |
| Width | 8 to 24 inches |
| Flower Color | Blue, Pink, Purple, White |
| Foliage Color | Blue/Green |
| Zones | 10, 2, 3, 4, 5, 6, 7, 8, 9 |
| Propagation | Seed |
Where to Plant Chickpeas
Chickpeas can grow in garden beds or containers. The important thing is that you select a growing location that receives full sun and has well-draining soil. Chickpeas are compact, bush-type plants, and they don’t need trellising. Container-grown chickpeas should be grown in well-draining pots that are at least 8 inches deep.
Some growers plant chickpeas in rows, while others interplant chickpeas with other crops, like leafy greens. Avoid growing chickpeas in an area where you recently planted legumes. Some plant diseases and pests can linger in the soil for a few years, so it’s a good idea to rotate crops.
How and When to Plant Chickpeas
Chickpeas are slow-growing plants that take longer to mature than many other legumes. If you live in a cold area, start chickpeas indoors two to four weeks before your last frost date to ensure the plants have enough time to grow. Gardeners in warm regions can sow chickpeas outdoors after the last frost date of spring when soil temperatures are above 50°F.
Chickpeas started indoors should be planted in biodegradable pots to minimize transplant problems. There is no need to soak chickpea seeds before planting them; it can spoil the seeds and cause them to crack. Adding an organic inoculant to chickpeas before sowing them helps the plants fix nitrogen better and reduces fertilizer needs.
To plant, sow chickpeas 1 to 2 inches deep in a rich seed-starting mix or garden soil amended with compost. Plant individual seeds 3 to 6 inches apart, and space rows of chickpeas 18 to 24 inches from each other. Although these plants need room to grow, planting chickpeas somewhat close together keeps plants upright and prevents droopy stems.
Water the seeds well after planting and consider covering outdoor seeds with hardware cloth or a sheet of paper towels if birds frequently gobble up the seeds in your garden. Once chickpea seedlings are 3 to 4 inches high, thin out the weakest seedlings by clipping them off at the soil line so that the remaining plants are spaced at least 6 inches apart. Seedlings started indoors can be transplanted outside when they’re 4 to 6 inches high and the danger of frost has passed.
Chickpea Care Tips
Chickpea seeds take about 10 to 21 days to germinate, although this varies somewhat depending on the temperature and weather patterns. When chickpea plants are mature, they bloom and produce edible pods that can be cooked and eaten fresh or left to dry on the plant. Keep chickpeas healthy and productive throughout the growing season with proper care.
Light
Like most other food crops, chickpeas are full-sun plants that need at least 6 to 8 hours of direct sun daily. In hot climates, chickpeas can grow in partial afternoon shade, although they might produce fewer pods.
Soil and Water
Fertile, sandy, or loamy soil with a pH between 5.3 and 7.0 is ideal for chickpea plants. Before planting chickpea seeds, amend the garden soil with compost or aged manure for optimal growth.
Water chickpeas regularly with about 1 inch of water per week throughout the growing season; plants in hot climates may need 2 inches of water weekly to prevent wilted leaves. Direct the water toward the soil line and keep the plant leaves as dry as possible to prevent fungal issues. Avoid overwatering newly planted seeds, as this can cause seeds to crack and not grow.
Give your chickpea plants an advantage by installing a drip line irrigation system to supply a steady flow of water straight to the plants’ roots. Add mulch around the base of the chickpea plants to reduce weeds and keep the soil from drying out quickly.
Temperature
Chickpeas grow best in warm weather when daytime temperatures are between 70°F and 80°F and nighttime temperatures stay above 65°F. These plants can usually withstand a light frost, but cold weather that arrives early in the fall can damage chickpeas and limit autumn harvest yields.
Fertilizer
Like other legumes, chickpeas fix nitrogen in the soil and don’t need much fertilizer. If you amend garden soil with compost before planting, chickpeas usually don’t need any supplemental fertilizer throughout the growing season. To give your plants a boost, side dress with compost as needed.
Harvesting
Harvest season usually begins in late summer, about 85 to 100 days after the chickpeas are planted. However, growers have a couple of options for harvesting chickpeas.
For fresh chickpea pods, pinch the immature, green pods from the plant's stems when they’re still small. Boil the fresh chickpeas in the pods in salted water for about five minutes. Drain them and run them under cold water to cool them off.
For dried chickpeas, allow the chickpea pods to dry fully on the plant until they are brown and brittle and the seeds inside rattle. When this occurs, harvest the entire chickpea plant and dry it in a warm, well-ventilated, and sheltered spot until the pods crack open easily. When the pods begin to split open, remove the chickpeas and compost the empty pods.
To prevent pests from ruining your harvest, freeze the chickpeas for 48 hours or spread them on a baking sheet and bake them at 160°F for 30 minutes. After this treatment, store dried chickpeas in airtight containers in your pantry or preserve them by canning or freezing.
Pests and Problems
Chickpeas contain malic acid and have hairy stems and pods, which makes them naturally resistant to most pests, but there are a few exceptions.
Aphids are common garden pests that feed on plant sap, causing distorted leaf growth, and sometimes transmitting viral diseases that damage chickpea plants. Control these pests with a strong blast of water from your garden hose and an organic insecticidal soap spray.
Leafhoppers also feed on plant sap, and they’re particularly fond of legume plants. These pests can be controlled with organic insecticidal soap and by companion planting with flowering dill and chives to attract predators.
Flea beetles jump wildly when disturbed, and their dark bodies can be difficult to spot in dense plant foliage. Fortunately, these pests are easy to control by companion planting with trap crops like radishes, green onions, and catnip.
How to Propagate
If you want to save your own chickpea seeds for planting next season, wait for the chickpea pods to dry fully on the plant, and harvest the pods when they are brown and brittle. Continue to dry the pods in a warm, ventilated spot until they begin to crack open. Remove the seeds from the pods and store the seeds in a dry, dark spot until you’re ready to plant.
Types of Chickpeas
Kabuli and Desi are the two main types of chickpea plants. They are classified based on seed size, thickness, color, and shape. The majority of chickpeas grown in the U.S. are Kabuli types.
