After you've cleaned out your summer container plants, don't put away your pots just yet. Instead, use the opportunity to create some stunning winter containers to brighten your doorstep or deck. With a few live evergreen branches, berries, and seasonal accents, it's easy to put together a fresh and cheery holiday container display. As with any container arrangement, aim to have a bold focal point in the center and include something that drapes over the side (think: thriller, filler, and spiller). Here are two simple designs to get you started, but feel free to substitute and add items depending on the plant material available in your area.
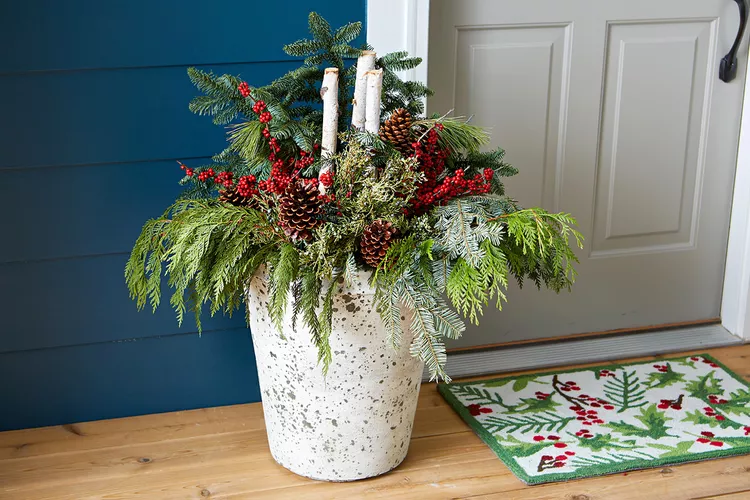
Large Winter Container Garden
Fill an empty spot in your garden during the colder months with this winter container display, or put two together to frame your front door.
Step 1: Fill a pot with soil.
Fill a large winter-safe pot to 3/4 full with potting soil (or use any left-over soil from your summer displays). Press the soil down slightly so that it stays in place and provides a sturdy base for the evergreen branches.
Step 2: Create a focal point.
Arrange three narrow white birch branches in the center of the container as a focal point. Push them down into the soil as far as they will go. Use different lengths for a more dynamic look.
Step 3: Arrange evergreen branches.
Place fir branches (or the sturdiest branches you have) around the base of the birch branches. Tuck in pine, cedar, and juniper branches around the container until you have a full arrangement. Mix up the different textures and shades of green as you wish. Use cedar branches or any draping evergreen around the rim of the container to spill over the sides.
Step 4: Add natural accents.
Finish with winterberry stems or any other ornamental decorations, such as dried hydrangeas, pinecones, or dried seed pods. If the planter is against a wall, focus these accent pieces at the front of the container.
Small Winter Container Garden
A miniature Christmas tree always looks adorable. Set this container in a spot that's easy to get to so you can turn on the lights at night.
Step 1: Fill a pot with soil.
Fill your container to 3/4 full with compacted soil. Press the soil down slightly so it stays in place and provides a sturdy base for your fresh evergreens. Use your hand or a trowel to dig a hole 4 to 6 inches deep and about an inch wider than the potted tree you're planting.
Step 2: Plant small spruce tree.
Plant a small potted spruce tree in the hole. (If you're not planning to plant the tree in the ground in the spring, use a pre-cut tree topper instead.) Make sure the top of the root ball sits level with the soil surface in the container. Fill in any space around the tree's roots with soil and firmly tamp down around the trunk.
To transplant the tree in your yard, wait until spring when the soil has thawed. Choose a place in your yard that gets plenty of sun and has enough room for the tree to grow. Dig a hole twice as large as the root ball and bury the tree at the same depth as it was in the container. Only fertilize the tree after you see growth in the spring.
Step 3: Fill in with evergreen branches.
Use branches of juniper, cedar, and pine to fill in around the spruce tree. Tuck the cut ends of the evergreen branches into the soil and keep adding around the container for a full and lush look. Be sure to stick shorter evergreens in front and taller in the back. For example, pine and juniper branches are a good filler around the container, and cedar branches are ideal for sitting in the front and spilling over the sides of the container.
Step 4: Decorate the tree.
Decorate the small tree in the center however you'd like. Beaded garland and small plastic ornaments work well (don't use glass bulbs because they can crack in the cold). Finish off the display with string lights, twinkle lights, or ribbon.
These containers are the perfect way to celebrate the natural textures and colors of winter. They're easy to assemble, and the materials will stay colorful and full all season long.
